
Image compression (Part 1) - Image Quality
Introduction
One of the biggest challenge for most mobile app developer is to make the distributed app file size small (apk for android or ipa for iOS). As mobile apps are distributed as a bundle installer (like a zip file) with all resources embedded that require to run the app successfully, the file size will grow over time. It is often found that the images are occupying the biggest bulk of the app size. Moreover, a lot of images are also sending down to the users via the internet connection constantly in some of the apps such as e-commerce and social media apps.
It is therefore important to choose the correct image size and quality that is suitable for the user.
Quality vs File Size
It is a simple math actually.
Better quality needs bigger file size.
We maybe tempted to choose for higher quality images, but wait a minute. Let’s imagine a user uploads an eight-megapixel photo from a mobile device. If another user with same screen resolution would want to see the image, it makes sense to display in same resolution and same size as the original image. But what about a user with whose screen is only half or a quarter of that size? What if the image is just a thumbnail? Does it even make sense to transmit full eight-megapixel photo across the internet?
Usually, we use a variety of image compression algorithms to help us with saving the file size. Typically, the compressor will ask us to define a number for image quality. As the value gets lower, so does the file size and the image quality.
Choosing the value is hard. Too low will result in bad image artifacts and user will complain about lack of image quality. Too high will cause us to send larger file unnecessarily.
For a small set of image files, we may rely on the designer to judge on image quality as we adjust the image compression level, but this approach will not work in large scale - for example, what if we have 15 millions users uploading images everyday. Sadly, most developers today will simply choose a quality setting for all images in their service.
Based on imgmin project, some of the websites are just applying the compression factors between 75 to 100.
Google Images thumbnails:  74-76
Facebook full-size images: 85
Yahoo frontpage JPEGs:     69-91
Youtube frontpage JPEGs:   70-82
Wikipedia images:          80
Windows live background:   82
Twitter user JPEG images:  30-100, apparently not enforcing quality
This approach is not the best answer, and It is still a million-dollar question - how do we find the right value, per image, at scale?
What reduces image quality
Human eye is pretty sensitive to a number of things when viewing the images including edges and gradients. If there is an error with an edge between two expected values or mismatch, our brain will notice it.
| Original | Loss of edges after heavy compression |
|---|---|
 |
 |
Most image compression algorithms break the pixel data into BLOCKS of pixels (blocking) and quantized to reduce the number of unique colors in the image (quantization). Then the image will be modified based on the locality of image.
For example, JPG will group pixels into 8x8 blocks and attempt to find the similar colors for that region. This usually works because image tends to have a local regions of interest. If we look at one corner and the other corner in a random image, we found there is little or none correlation. However, in a photograph, there tends to have gradient and similar colors across the blocks. The result of blocking process makes the nearby pixels not sharing the same colors in photograph and we will start noticing the edges between the blocks.
Measure Image Quality
Although our brain could instinctively recognize the bad image quality, it cannot help when we are automating the processing of images that the user uploads. It is important to have a mathematical, measurable, and programmable concept of image quality.
Today, there are two - peak signal-to-noise ratio (PSNR) and structural similarity index measure (SSIM).
PSNR
It expresses the relationship between max possible power of a signal and the power of corrupting noise. In simple term, it measures how much the values of original image differ from the compressed image. But there is a few problems with PSNR measurement. It could be slightly biased toward over-smoothed (blurry) image. It means that if part of the texture is also removed, scores could be high.
In addition, PSNR metric relies strictly on numeric comparison and does not consider biological factor of human vision system. Therefore, the compression result might be good from numeric values, but to human eye, it is a bad quality.
SSIM
SSIM was developed to address the shortfall of PSNR and take human perception into account when considering the compression quality of images. This is done by looking at the similarity of edges between the source and the compressed image. SSIM might look like a better quality measurement, but it is more complicated to compute.
The image below show the calculated PSNR and SSIM side by side.
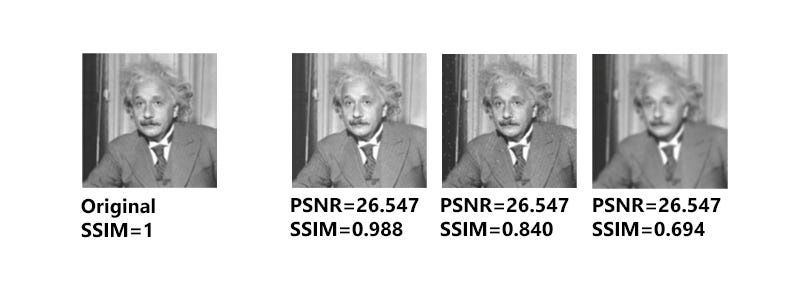
We notice the image quality is different even thought PSNR is the same.
The idea of measuring image quality using PSNR and SSIM is to show that we could automate the image compression quality if needed. In many development, what most developers are doing is to have designer or artist to hand-check the quality of a few samples and then choose a compression level for all of the rest of the images based on that.
Applying practically
It is now becoming obvious that different images will require different export settings depending on the measurement results. For example, a picture of sunrise over a mountain is going to be different from a picture of pencil drawn image of sunrise. How do you achieve that in development environment?
Creating a cloud-compute resource to iteratively find the ideal quality is a straightforward path, but it means we need the time and financial resources to achieve that.
Imagine we have some images stored in our cloud backend and the user will download and display those images from their mobile devices or their computers. Where should the resizing occur?
Sending full resolution image to the device and resizing it before rendering is easiest in term of developer workload. But we are sending a lot of extra bits and bytes to the user who will not use them or see them. It is like throwing the money into the sea.
A better solution is to resize the image in our cloud, cache the resized image somewhere, so that we could send the smaller image to the smaller screen device. In most scenarios, I have seen 3 sizes - one for thumbnail, one for super high resolution for full screen and some in between. Android developer uses the same concept with - ldpi, mdpi, hdpi, xhdpi, etc, to serve the different resolutions for different screen sizes.
Conclusion
In summary, images are important in every application and probably the largest data chunk (maybe after video). Sending appropriate sized image has multiple benefits: less data needed for users, little to none resizing needed (less GPU footprint), faster decoding and loading of images and better user experience for our users. In next article, we will compare the image formats such as JPG, PNG and WebP.